Step-by-Step Guide to Creating a Bundle Product in Salesforce Revenue Cloud
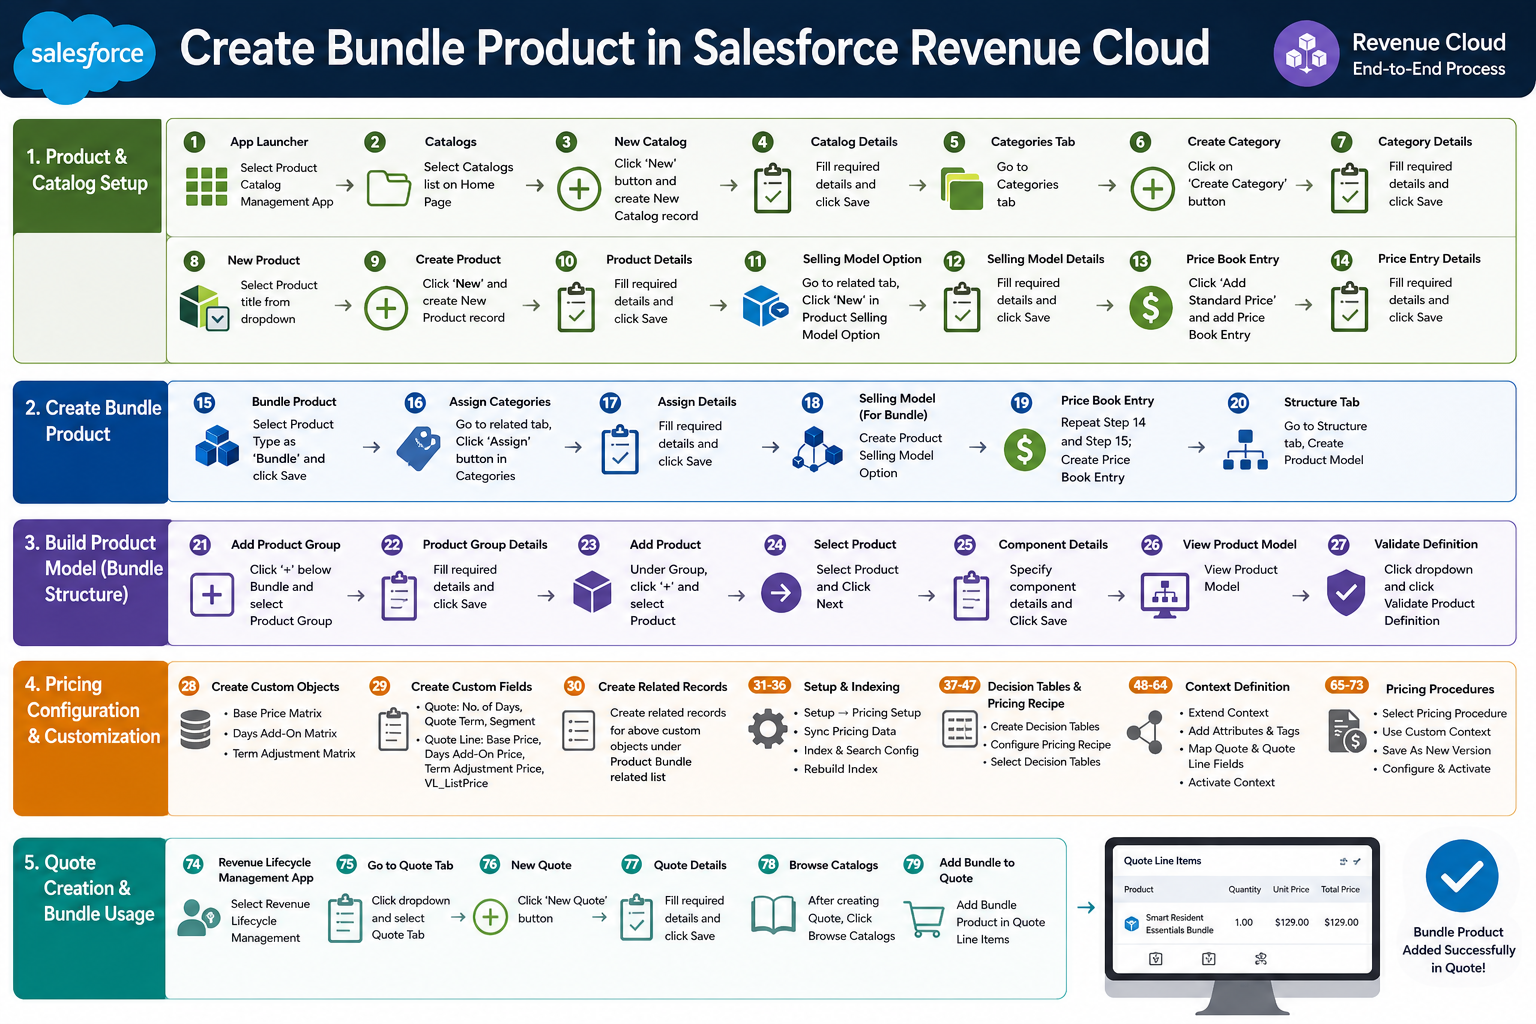
Create Bundle Product in Revenue Cloud
- In App Launcher, Select Product Catalog Management App
- In Product Catalog Management App, Select Catalogs list On Home Page
- Click on ‘New’ Button and create New Catalog record
- Fill required details and click Save
- In Catalog Record, Go to Categories tab
- Create New Category, Click on ‘Create Category’ Button
- Fill required details and click Save
- Click on Drop down Arrow, Select Product title
- Click on ‘New’ Button and create New Product record
- Fill required details and click Save
- Go to related tab, Click on ‘New’ button in Product Selling Model Option
- Fill required details and click Save
- In related tab, Click on ‘Add Standard Price’ Button in Price Book and add Price Book Entry
- Fill required details and click Save
- Fill required details, Select Product Type as “Bundle” and click Save. (Create bundle Product)
- Go to related tab, Click ‘Assign’ button in Categories
- Fill required details and click Save
- Create Product Selling Model Option for Product Bundle
- Create Price Book Entry
- Go to Structure tab, Create Product Model
- Click the + symbol below Smart Resident Essentials Bundle and Click on Product Group
- Fill required details and click Save
- Under Nile Access Group, click the + symbol, Click on Product
- Select Product and Click on Next
- Add Specify component details and Click on Save
- View Product Model
- Click on Drop down and click on Validate Product Definition
- Create the following Custom Objects:
Base Price Matrix:
The Base Price Matrix custom object is used to define the standard pricing structure for products or services in the SmartLiving catalog. It stores the default product price based on predefined criteria such as product type, service category, region, or customer segment. This matrix helps automate consistent pricing calculations during product configuration and quote generation.
Days Add-On Matrix:
The Days Add-On Matrix custom object is used to manage additional pricing adjustments based on the number of service days selected by the customer. It allows the system to automatically apply extra charges, discounts, or daily rate calculations when service duration exceeds the standard term.
Term Adjustment Matrix:
The Term Adjustment Matrix custom object is used to apply pricing modifications based on contract duration or subscription term length. It supports flexible pricing strategies by defining discounts, surcharges, or percentage adjustments for short-term or long-term service agreements.
- Create the Following Custom Fields on Quote & Quote Line Object as per requirement:
Quote:
o No. of Days
o Quote Term
o Segment
Quote Line:
o Base Price
o Days Add-On Price
o Term Adjustment Price
o VL_ListPrice
- Create the related records for the above custom objects under the Product bundle related list
- Click on Setting and Click on Setup
- Go to Setup, Search for the Salesforce Pricing Setup in Quick find and Click on the Salesforce Pricing Setup
- In Sync Pricing Data, Click on ‘Sync’ Button
- In Product Catalog Management App, click the Index and Search Configuration tile
- Click Rebuild Index
- Select Partial Index Rebuild, and click Rebuild
- Creating Decision Tables for the Custom Objects: Navigate to Setup Page ,In Quick Find search for “Decision Table” and click it
- Click on “New” button
- Enter all the required details on the page, Click “Save & Next”
- Select Salesforce Object, Add the condition as per requirement ,Click “Save & Next”
- Enter the Behaviours for the Decision Table as per requirement, Click “Save & Next
- In the Preview Screen verify that the records from the selected source object are visible , Click “Finish”
- Now we need to Click on “Activate” button to activate the decision table
- In the Quick Find search for “Pricing Recipes” and click it
- Select the Default Pricing Recipe
- In the Pricing Recipe, click on the “Price Adjustment Matrix” tab, Click on “Modify” button
- Select the created Decision Tables and change “Pricing Component Type = List Price”, Click on “Save” button
- In the Quick Find Search for “Context Definition” and click on it
- From the Context Definitions Click on the Dropdown next to “SalesTransactionContext”, Click on “Extend”.
- Give name to the Context Definition and Click on “Save” button
- Now navigate to the “Custom Definitions” tab
- Select the newly created Custom Context Definition
- Click on the “Edit” button
- Click on “Next” button on edit screen
- Click on the “Next” button on Edit Structure screen
- Select the “Sales Transaction” Node , Click on “Add Attributes” and add the attributes as per requirement
- Select the “Sales TransactionItem” Node, Click on “Add Attributes” and add the attributes as per requirement, Click “Next”
- Now Add Attribute Tags, Select the Nodes for which we created the Attributes , Add Tags for each of the Attributes created, Click “Save” button
- Navigate to the “Map Data” tab on the Context Definition
- Click on the drop down next to “QuoteEntitiesMapping”, Click on “Edit SObject Mapping”
- Select the option for “Mark as Default”, Click on the “Map” buton
- Click on the “Proceed” button
- Mapping Context Definition fields with Quote & QuoteLine Object Fields, Click on Save
- Click on the “Activate” button to activate the Custom Context Definition
- In the App Launcher search for “Price Management” App and click on it
- Click on the “Pricing Procedures”
- Select the Pricing Procedure record “Revenue Management Default Pricing Procedure V1”
- Click on the “Edit” button
- From the dropdown list Select the Custom Context Definition we created above, Click on “Save” button
- Select the Pricing Procedure Versions.
- Click on the “Save As” button, Select the option for ” New Pricing Procedure Versions”.
- Now we will configure the New Pricing Procedure Versions as per the requirement, Click on “Save” button, Click “Activate” button
- From the App Launcher, find and select Revenue Lifecycle Management.
- Click on Down Arrow and select Quote Tab
- Create New Quote, Click on ‘New Quote’ button'
- Fill required details and click Save.
- After create Quote, Click on Browse Catalogs
- Add Bundle Product in Quote Line Items
Detailed Instruction: Create Bundle Product in Revenue Cloud