How to Connect Claude with Salesforce
How to Connect Claude with Salesforce
Introduction
Businesses often need to access and manage Salesforce data while performing development and administrative tasks. Traditionally, developers have to switch between Salesforce, Salesforce CLI, and other development tools to query records, inspect objects, and make record changes.
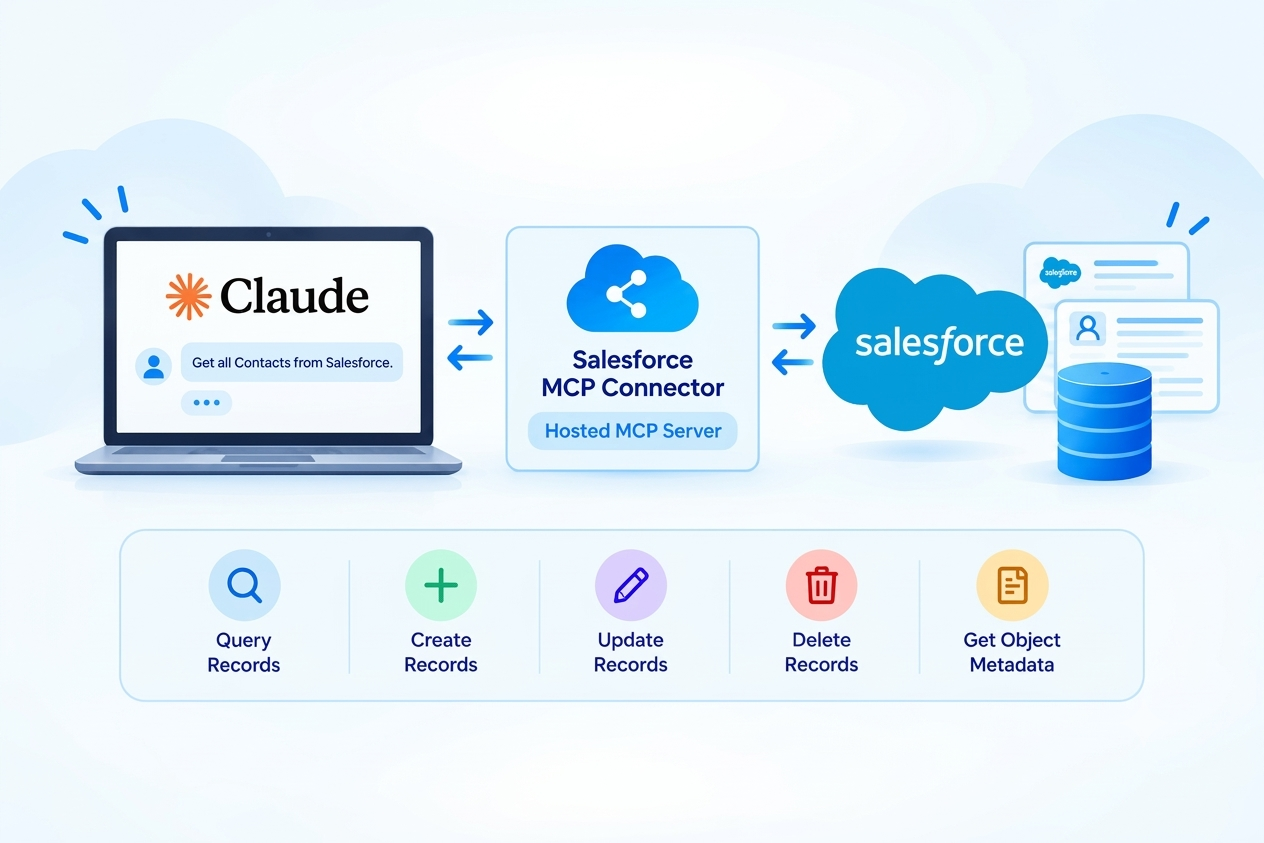
By connecting Claude with Salesforce, Claude can interact with a Salesforce org through the Salesforce MCP (Model Context Protocol) connector. This allows users to give natural-language instructions to Claude and use supported Salesforce tools to read, create, update, or delete Salesforce records.
The Salesforce connector provides different tools for working with Salesforce data, including SOQL queries, object schema information, related records, current user information, record creation, record updates, and record deletion.
In this article, we'll learn how to connect Claude with Salesforce, configure the required Salesforce connector, manage tool permissions, and use Claude to perform Salesforce operations.
👉Hire Salesforce Integration Experts
Solution Overview
The complete solution consists of the following components:
• Claude – Provides the natural-language interface through which users can give instructions.
• Salesforce MCP Connector – Establishes the connection between Claude and the Salesforce org.
• Salesforce Authentication – Allows Claude to access Salesforce using the connected user's permissions.
• Salesforce Tools – Provide specific capabilities for reading and modifying Salesforce data.
The overall flow is:
User Request → Claude → Salesforce MCP Connector → Salesforce Tools → Salesforce Org → Response
Step 1: Activate the Salesforce MCP Server
1. Open Salesforce Setup
• Log in to your Salesforce org
• Go to: Setup → Quick Find → MCP Servers
• Select MCP Servers under the API Catalog
2. Open Salesforce Servers
• Click the Salesforce or Salesforce Servers tab
• You will see the available Salesforce Hosted MCP Servers
3. Select the required MCP Server
• For example, select: sobject-all
• This server provides broader Salesforce object capabilities, including read and write operations
4. Activate the server
• Open the server and click: Activate
• After activation, copy the Server URL and keep it available for the Claude configuration
• Salesforce notes that a newly activated MCP server can take a short time to become active
Step 2: Create an External Client App
• Claude needs to authenticate with Salesforce before it can use the Salesforce MCP Server.
• Salesforce uses an External Client App (ECA) for this OAuth connection.
1. Open External Client App Manager
• In Salesforce Setup, search for: External Client App Manager
• Click: New External Client App
2. Enter Basic Information
• Enter the required information.
• Example:
App Name = Claude MCP Client
API Name = Claude_MCP_Client
Contact Email = Your email address
3. Enable OAuth
• Expand: API (Enable OAuth Settings)
• Enable OAuth
Add the Callback URL
• For a Claude connector, use: https://claude.ai/api/mcp/auth_callback
• This callback URL allows Salesforce to return the authentication result to Claude after the Salesforce login process
Add OAuth Scopes
Add the required scopes:
• Perform requests at any time (refresh_token, offline_access)
• Access Salesforce Hosted MCP Servers (mcp_api) 4. Configure Security
Enable the required security settings for the MCP OAuth flow, including:
• Require Proof Key for Code Exchange (PKCE) extension for Supported Authorization Flows
• Issue JSON Web Token (JWT)-based access tokens for named users
Salesforce's current MCP setup documentation uses PKCE and JWT-based tokens for the Hosted MCP authentication flow.
5. Create the External Client App
Click: Create Step 3: Get the OAuth Client ID
After creating the External Client App:
1. Open the newly created External Client App.
2. Go to the Settings tab.
3. Expand OAuth Settings.
4. Click Consumer Key and Secret.
5. Complete the Salesforce verification step if prompted.
6. Copy the Consumer Key and Consumer Secret • The Consumer Key will be used as the OAuth Client ID when configuring the connector in Claude.
• Note: Keep the Consumer Key and any client secret secure. In the Claude connector flow, Salesforce's current documentation indicates that the Consumer Secret generally isn't required unless Claude explicitly asks for it.
Step 4: Add Salesforce as a Connector in Claude
Now configure the Salesforce MCP Server in Claude.
1. Open Claude → Log in to Claude
2. Open Connectors → From the left sidebar, Go to: Settings → Connectors
3. Add a Custom Connector → Click: Add and then select: Add custom connector
Step 5: Configure the Salesforce MCP Connector
Enter the connector information.
Connector Name
• For example: Salesforce Devorg
Server URL
• https://api.salesforce.com/platform/mcp/v1/platform/sobject-all
• The server URL must correspond to the MCP Server activated in Salesforce OAuth Client ID
• Under the OAuth settings, select: Use your own OAuth client
• Paste the Consumer Key from the Salesforce External Client App into: OAuth Client ID
• Then click: Add
Step 6: Connect and Authenticate Salesforce
After adding the connector, you will see the Salesforce connector in Claude.
• Click: Connect
• Claude will redirect you to Salesforce for authentication
Salesforce Authentication
1. Log in to the Salesforce org.
2. Review the requested access.
3. Approve the connection.
4. Salesforce authenticates the user.
5. Salesforce returns the authentication result to Claude.
6. Claude establishes the MCP connection.
• Salesforce remains responsible for authentication and access control. MCP requests are made on behalf of the authenticated Salesforce user.
• After successful authentication, the connector should show as connected
Step 7: Configure Tool Permissions
• After connecting the Salesforce MCP Server, Claude provides access to the tools exposed by the server.
• The tools can be configured according to your requirements.
• For the sobject-all connector, the tools can include read-only and write/delete operations.
• For production environments, tool permissions should be configured according to the required business use case
Step 8: Test the Salesforce Connection
• After the connector is configured, test the connection using a simple natural-language request.
• Example:
Get the current Salesforce user information
• If the connection is working, Claude should use the Salesforce MCP tool and return information available to the authenticated Salesforce user
• You can then test a Salesforce query
• Example:
Get the first 10 Contacts from Salesforce
Benefits of Connecting Claude with Salesforce
Using Claude with Salesforce MCP provides several advantages:
• Natural-language Salesforce interaction
• Reduced manual effort
• Direct access to Salesforce data
• Ability to query Salesforce using natural language
• Ability to perform supported record operations
• Controlled access through Salesforce permissions
• OAuth-based authentication
• Configurable MCP tool permissions
Salesforce Hosted MCP Servers are designed to provide governed access to Salesforce data and functionality for MCP-compatible AI clients.
Conclusion
Connecting Claude with Salesforce through Salesforce Hosted MCP Servers provides a secure way to interact with Salesforce using natural-language instructions.
The setup consists of three major stages:
1. Activate Salesforce MCP Server
↓
2. Create and configure External Client App
↓
3. Add and authenticate the Salesforce MCP Connector in Claude
Once connected, Claude can use the configured Salesforce tools to retrieve Salesforce data and, when permitted, create, update, or delete records.
Detailed Instruction: How to Connect Claude with Salesforce
👉 Reach out to us
✅ Ready to build AI-powered Salesforce integrations using Claude and MCP?
👉 Hire Salesforce Integration Experts